Google Earth and KML
Google Earth (http://earth.google.com/) is a virtual globe, which means it is a
desktop environment that simulates the three-dimensional aspects of the earth. It
runs on Windows, Mac OS X, and Linux. Google Earth is a cool application, rightfully
described as immersive. There are other virtual globes,[213][214]
Google Earth is also a great mashup platform. What makes it so?
The three-dimensional space of a planet is an organizing framework that is easy to understand—everyone knows his or her place in the world, so to speak.
KML—the XML data format for getting data in and out of Google Earth is easy to read and write.
There are other APIs to Google Earth, including a COM interface in Windows and an AppleScript interface in Mac OS X.
Displaying and Handling KML As End Users
I introduced KML earlier in the chapter but reserved a full discussion of it in the context of Google Earth. The main reason for this organizational choice is that although KML is steadily growing beyond its origins as the markup language for Keyhole, the precursor to Google Earth, the natural home for KML remains Google Earth. Google Earth is the fullest user interface for displaying and interacting with KML. You can also use it to create KML. At the same time, since Google Earth is not the only tool for working with KML, I’ll describe some useful tips for using those other tools.
A good and fun way to start with KML is to download and install Google Earth and to use it to look at a variety of KML files. Here are some sources of KML:
The Google Earth Gallery (
http://earth.google.com/gallery/index.html)The Google Earth Community (
http://bbs.keyhole.com/ubb/ubbthreads.php/Cat/0)
It turns out that Google Maps and Flickr are also great sources of KML. After walking you through a specific example to demonstrate the mechanics of interacting with KML, I will describe how to get KML out of Flickr and Google Maps—and how to use Google Maps to display KML.
Let me walk you through the mechanics with one example:
http://maps.google.com/maps/ms?f=q&msa=0&output=kml&msid=116029721704976049577.0000011345e68993fc0e7
Downloading KML into Google Earth
Make sure you have Google Earth installed. You can download it from here:
After you have installed Google Earth, learn how to navigate the interface. At the least, you should get comfortable with typing addresses or business names, causing the Google interface to go to those places. Also learn how to use the Save to My Places functionality to create collections of individual items and how to change the properties of individual items, including the latitude, longitude, icon, and view of the item. Finally, you should be to be able to get KML corresponding to the collection.[215]
The classic way that most Google Earth users interact with KML is through clicking a link that causes a KML file to be downloaded and fed into Google Earth. (I’ll cover the technical mechanism for how that happens later in the chapter.) Here, I’ll walk through one such example of a KML file that you can download.
Go to the map of bookstores I created with Google My Maps:
http://maps.google.com/maps/ms?f=q&msa=0&msid=116029721704976049577.0000011345e68993fc0e7&z=14&om=1Click the KML link, which is as follows:
If your browser and Google Earth are set up in the typical configuration (in which Google Earth is registered to handle files with a
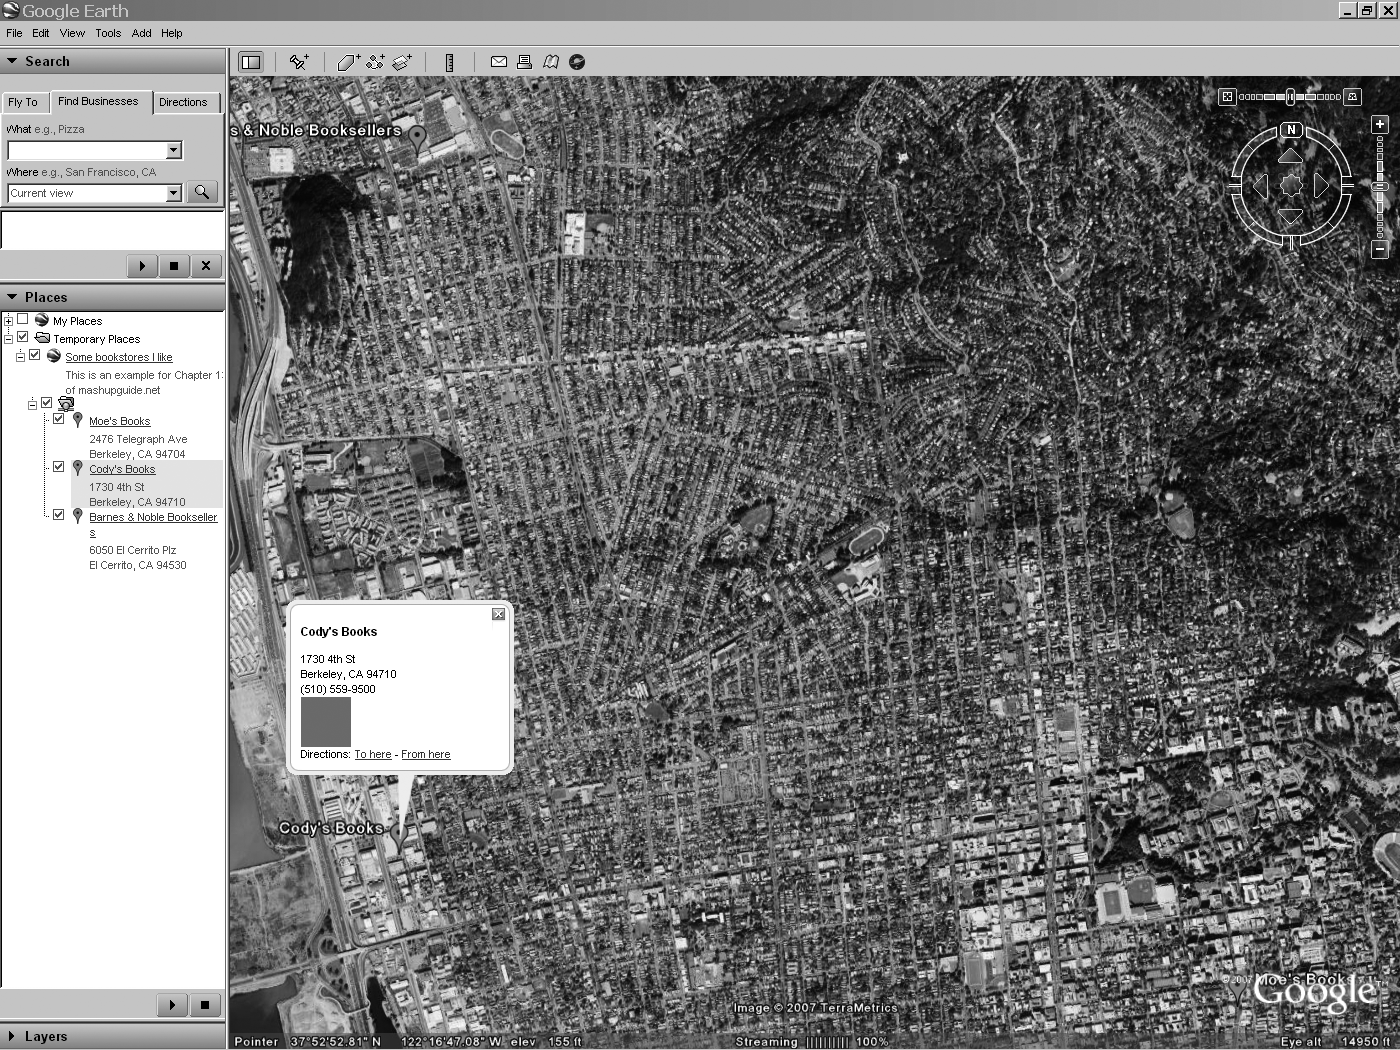
Content-Typeheader of “application/vnd.google-earth.kml+xml”), you will be prompted to let Google Earth open the downloaded KML. If you accept, the collection of points representing the bookstores is loaded into Temporary Places. Double-clicking the link of the collection spins the markers into view in Google Earth. See Figure 13-2 to see the Google Maps collection displayed in Google Earth.
Now that you have downloaded a KML file into Google Earth, let’s look at other tools that are useful for your study of KML.
Google Maps As a KML Renderer
You can use Google Maps to display the contents of a KML file. The easiest way to
do so is to go to the Google Maps page (http://maps.google.com) and enter the URL of the KML file as
though it were an address or other search term. Such a query results in the following
URL:
http://maps.google.com?q={kml-url}
For example, feeding the KML for the bookstore map back into Google Maps, we get the following:
I have found using Google Maps to be an incredibly useful KML renderer. First, you can test KML files without having access to Google Earth. Second, you can let others look at the content of KML files without requiring them to have Google Earth installed. You should be aware, however, of two caveats in using Google Earth to render KML:
Google Maps does not implement KML in total—so don’t expect to replace Google Earth with Google Maps for working with KML.
Google Maps caches KML files that you render with it. That is, if you are using Google Maps to test the KML that you are changing, be aware that Google Maps might not be reading the latest version of your KML file.
KML from Flickr
You can now use Flickr to learn more about KML. Currently, although there’s no official documentation, you can refer to Rev. Dan Catt’s weblog entry to learn some of the details about getting KML out of Flickr:
http://geobloggers.com/archives/2007/05/31/flickr-kml-and-a-stroll-down-memory-lane/
The following KML feeds contain at most 20 entries. You have two choices about the format to use:
format=kml_nlfor the KML network link that refreshes periodically to show the latest photos. (I will discuss the KML<NetworkLink>element in a moment.)format=kmlfor the static KML that contains the data about the locations.
So, anywhere I write format=kml_nl, you can substitute
format=kml.
When you are looking at these feeds, it’s helpful to remember that in addition to using Google Earth as a KML viewer, you can use Google Maps, which I find very convenient. Just drop the URL for the KML file into the search box for Google Maps, and you can have the KML file displayed in Google Maps. For instance, you can take the KML for the 20 most recent geotagged photos in Flickr, like so:
http://api.flickr.com/services/feeds/geo/?format=kml_nl
and drop it into Google Maps, which you can access here:
Currently, you can get a KML feed for an individual user with this:
http://api.flickr.com/services/feeds/geo/?id={user-nsid}&format=kml_nl
For example, here’s the feed for Rev. Dan Catt:
http://api.flickr.com/services/feeds/geo/?id=35468159852@N01&format=kml_nl
You can get the KML feed for a group here:
http://api.flickr.com/services/feeds/geo/?g={group-nsid}&format=kml_nl
For example, here’s the KML feed for the Flickr Geotagging group:
http://api.flickr.com/services/feeds/geo/?g=94823070@N00&format=kml_nl
You can get KML feeds for a tag, such as flower:
http://api.flickr.com/services/feeds/geo/&tags=flower&format=kml_nl
You can get KML feeds for locations. Here are some examples:
http://api.flickr.com/services/feeds/geo/us/ca/berkeley/?format=kml_nlhttp://api.flickr.com/services/feeds/geo/uk/london/?format=kml_nlhttp://api.flickr.com/services/feeds/geo/ca/on/toronto/?format=kml_nlhttp://api.flickr.com/services/feeds/geo/FR/%C3%8Ele-de-France/Paris?format=kml_nlhttp://api.flickr.com/services/feeds/geo/cn/beijing/?format=kml_nlhttp://api.flickr.com/services/feeds/geo/cn/%E5%8C%97%E4%BA%AC/?format=kml_nl
Note that the last two links are both for Beijing (北京).
You can do a combined search on a user, location, and tags. For example, to get
Raymond Yee’s photos in Berkeley, California, tagged with flower,
use this:
![[Caution]](../docbook_images/caution.png) | Caution |
|---|---|
Look for official documentation on KML in Flickr to see how it evolves beyond its early beginnings. |
KML
Although KML at its heart is a simple dialect of XML, Google is steadily adding features to do more and more through KML. The home for KML documentation is here:
http://code.google.com/apis/kml/documentation/
Don’t overlook the file of KML samples that the documentation refers to, because the examples are very useful:
http://code.google.com/apis/kml/documentation/KML_Samples.kml
You can have these rendered in Google Maps:
http://maps.google.com/maps?q=http%3A%2F%2Fkmlscribe.googlepages.com%2FSamplesInMaps.kml
The goal in this section is to get you started with how to read and write KML.
Let’s start with a simple example of KML that contains a single
<Placemark> element, whose associated <Point>
element is located at the Campanile of the UC Berkeley campus:[216]
<?xml version="1.0" encoding="UTF-8"?>
<kml xmlns="http://earth.google.com/kml/2.1">
  <Placemark id="berkeley">
    <name>Berkeley</name>
    <description>Berkeley, CA</description>
    <Point>
      <coordinates>-122.257704,37.8721,0</coordinates>
    </Point>
  </Placemark>
</kml>
The <Point> element defines the position of the placemark’s
name and icon. You can read the file into Google Earth to display it or use Google Maps
to render it:
http://maps.google.com/maps?q=http:%2F%2Fexamples.mashupguide.net%2Fch13%2Fberkeley.simple.kml
You can validate the KML using the techniques described here:
http://googlemapsapi.blogspot.com/2007/06/validate-your-kml-online-or-offline.html
For instance, you can feed to the file to Feedvalidator.org, which validates KML (in addition to RSS and Atom feeds):
Using your favorite XML validator, you can also validate the KML against the XML Schema for KML 2.1 located here:
http://code.google.com/apis/kml/schema/kml21.xsd
Adding a View to a Placemark: LookAt and Camera
The previous KML document defined a specific point for positioning the
placemark’s name and icon but did not specify a viewpoint for the placemark.
Given that you can zoom around the virtual globe from many angles, you won’t be
surprised that KML allows you to define a viewpoint associated with a placemark.
There are two ways to do so: the <LookAt> element and the
<Camera> element (defined in KML 2.2 and later). You will find
excellent introductory documentation for these two elements here:
http://code.google.com/apis/kml/documentation/cameras.html
Here I use a series of examples to illustrate the central difference between
<LookAt> and <Cam
era>: <LookAt> specifies the viewpoint in terms of
the location being viewed, whereas <Camera> specifies the
viewpoint in terms of the viewer’s location and orientation. I have gathered
the examples in a single KML file:
http://examples.mashupguide.net/ch13/berkeley.campanile.evans.kml
which you can view through Google Earth or Google Maps here:
or here:
I recommend loading the KML into Google Earth and in Google Maps so that you can
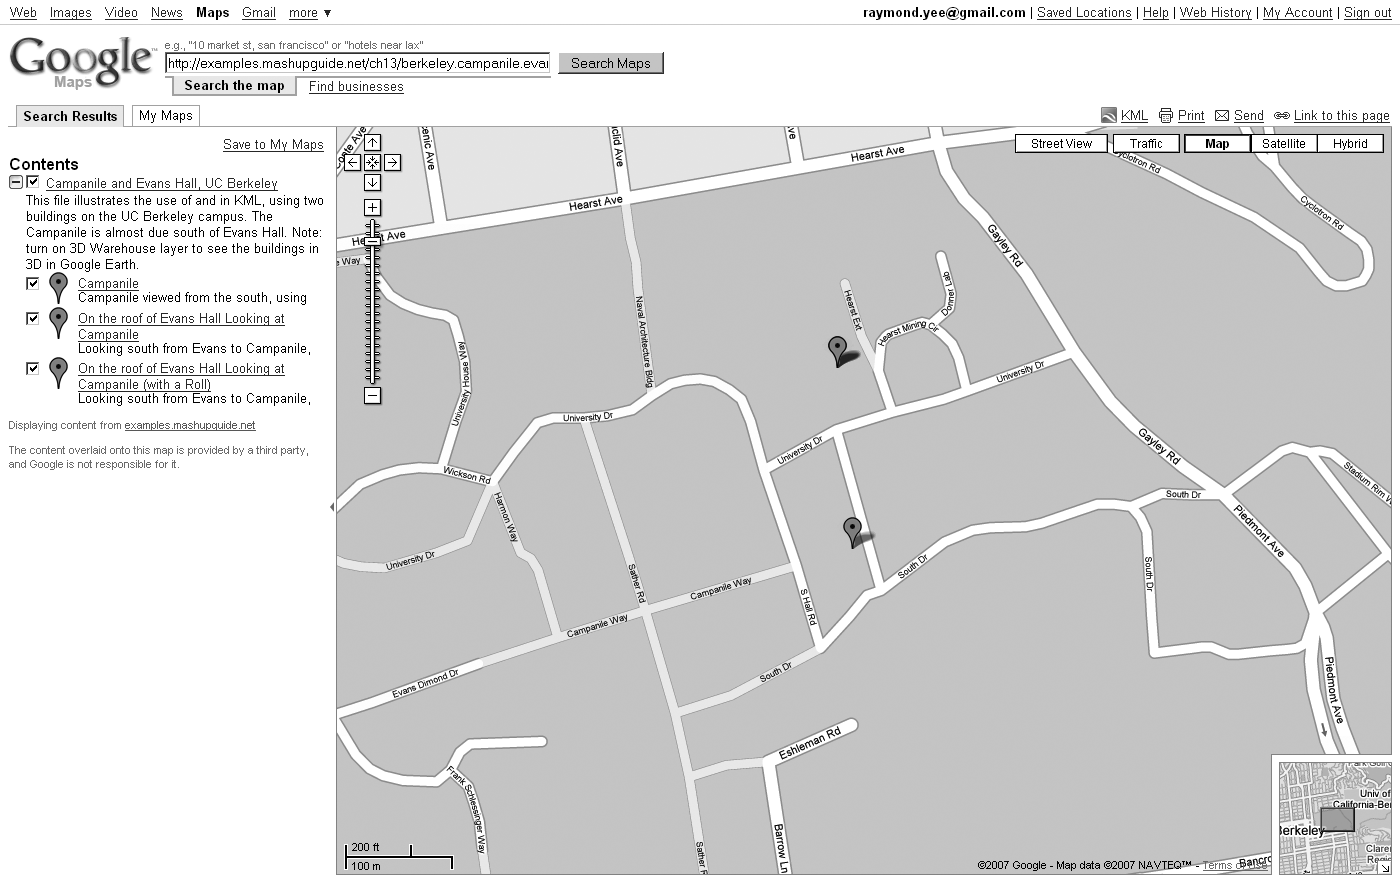
follow along. See Figure 13-3 for how this KML file looks in Google Maps. Notice that
there are three <Placemark> elements for two buildings: the
Campanile, which sits almost due south of Evans Hall, and Evans Hall, both on the UC
Berkeley campus.
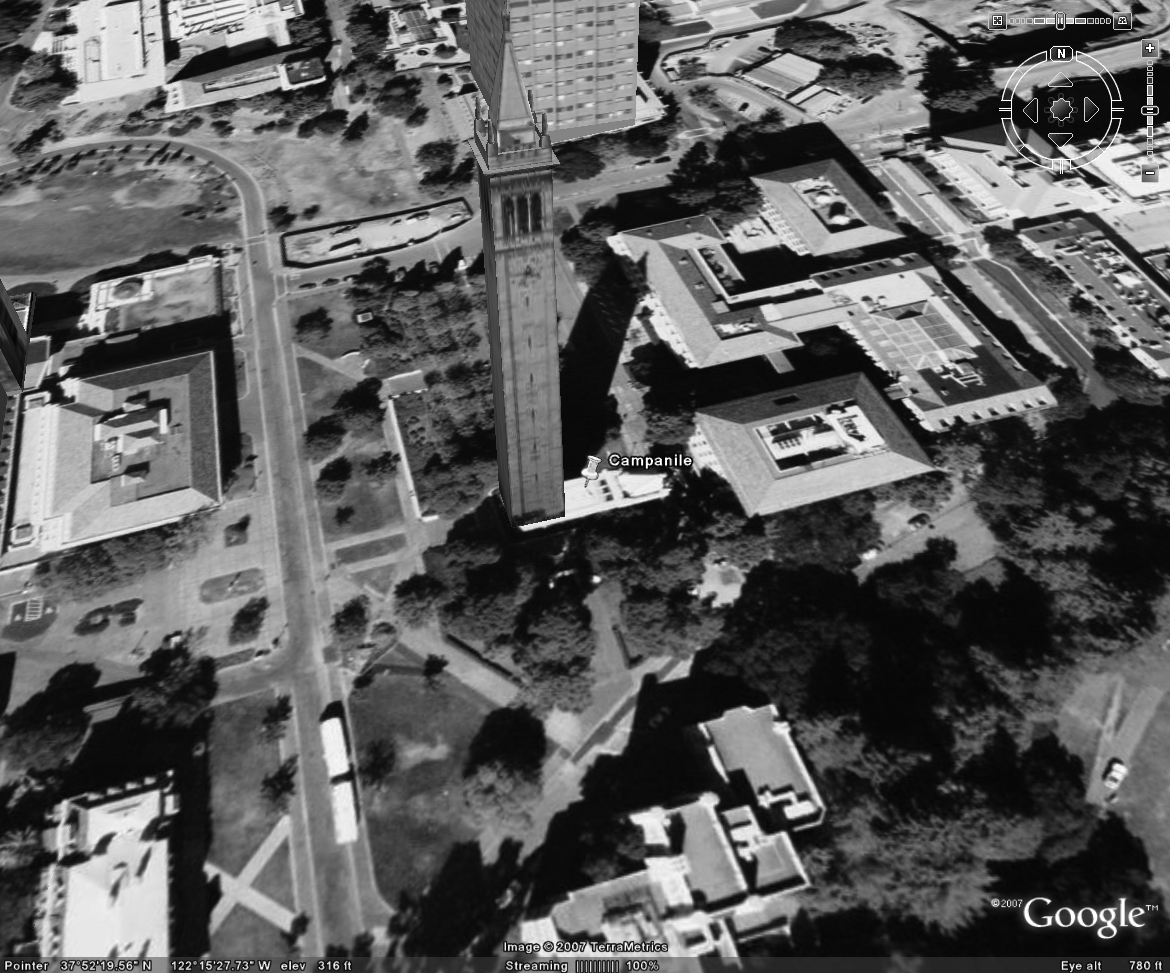
The first placemark is placed at the Campanile and uses a
<LookAt> element to specify a viewpoint for the Campanile (see
Figure 13-4 for a rendering of this placemark in Google Earth):
<Placemark id="Campanile">
  <name>Campanile</name>
  <description><![CDATA[Campanile viewed from the South, using  <LookAt> (range=200,
tilt=45, heading=0)]]></description>
  <LookAt>
    <longitude>-122.257704</longitude>
    <latitude>37.8721</latitude>
    <altitude>0</altitude>
    <altitudeMode>relativeToGround</altitudeMode>
    <range>200</range>
    <tilt>45</tilt>
    <heading>0</heading>
  </LookAt>
  <Point>
    <coordinates>-122.257704,37.8721,0</coordinates>
  </Point>
</Placemark>
In addition to the <Point> element, which specifies a marker to
click for the placemark, the KML defines a point of focus whose latitude and
longitude are 37.8721 and -122.257704 and whose altitude is
0 meters (relative to the ground). The distance between this point of focus and the
viewer is specified in meters by the range element. (In this example,
the virtual camera of the viewpoint is 200 meters away from the point.) Two further
parameters control the orientation the viewpoint:
tiltspecifies the angle of the virtual camera relative to an axis running perpendicular to the ground. In other words, 0 degrees means you are looking straight down at the ground; 90 degrees means you’re looking at the horizon. In the case of our example,tiltis 45 degrees, which you can pick out from Figure 13-4. (tiltis limited to the range of 0 to 90 degrees.) Note that the default value is 0 degrees, which is, in fact, the only value that is supported in Google Maps.heading(which ranges from 0 to 360 degrees) specifies the geographic direction you are looking at. Zero degrees, the default value, means the virtual camera is pointed north. In this example,headingis indeed 0—we are looking at the Campanile from the south. We can see Evans Hall to the north. In Google Maps, the rendered heading is fixed to 0 degrees—north is always up.
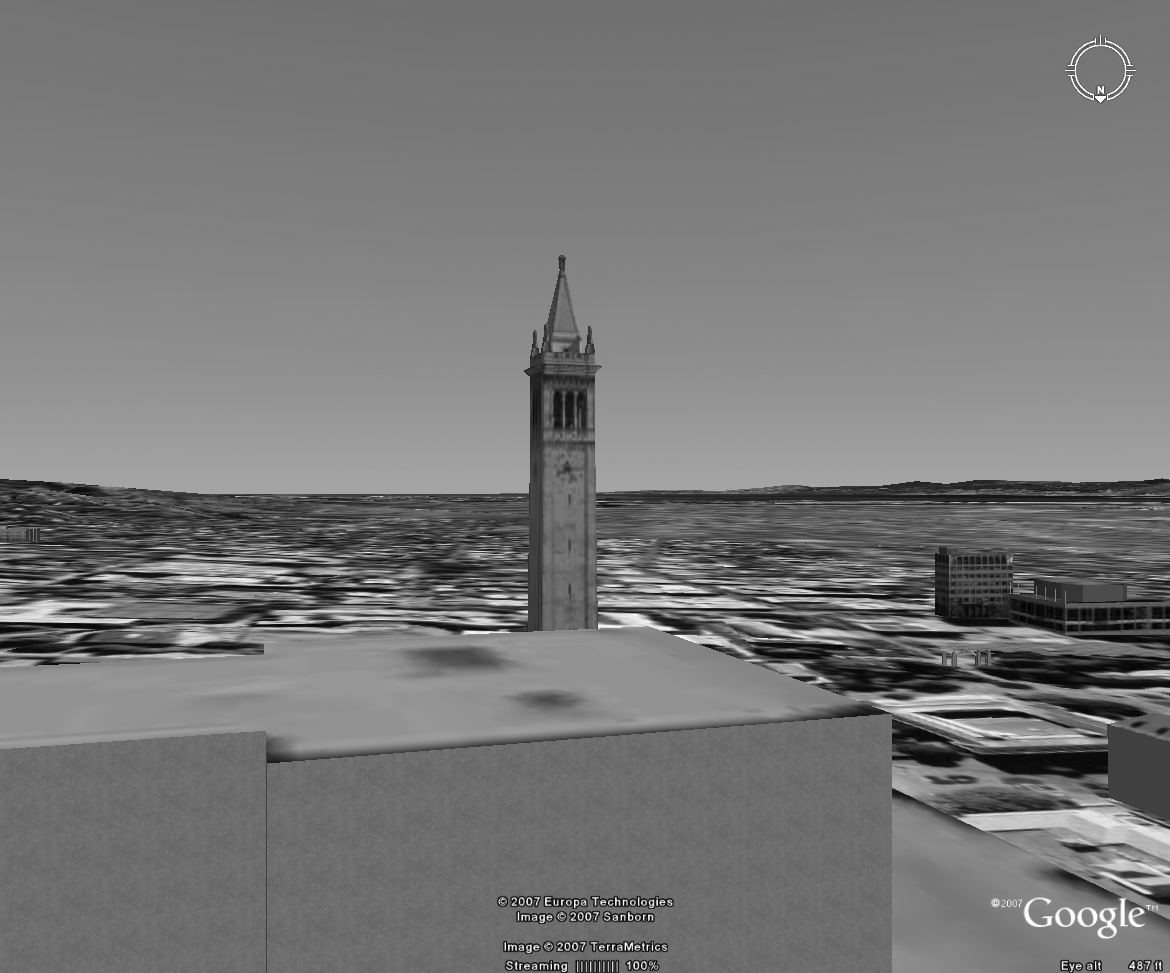
Now let’s consider a second placemark, which appears as Figure 13-5 when rendered in Google Earth:
<Placemark id="Evans">
  <name>On the roof of  Evans Hall  Looking at Campanile</name>
  <description><![CDATA[Looking south from Evans to Campanile, using <Camera>
(heading=180,  tilt=90, roll=0)]]></description>
  <Camera>
    <longitude>-122.2578687854004</longitude>
    <latitude>37.87363451913904</latitude>
    <altitude>50</altitude>
    <altitudeMode>relativeToGround</altitudeMode>
    <heading>180</heading>
    <tilt>90</tilt>
    <roll>0</roll>
  </Camera>
  <Point>
    <coordinates>-122.2578687854004,37.87363451913904,0</coordinates>
  </Point>
</Placemark>
You set up the <Camera> element by specifying the location and
orientation of the viewer instead of the point of focus. The latitude/longitude for
the camera corresponds to Evans Hall, a point north of the Campanile. The altitude
(50 m) is roughly roof height for Evans Hall. Let’s look at the three angles
that are part of a <Camera> element definition:
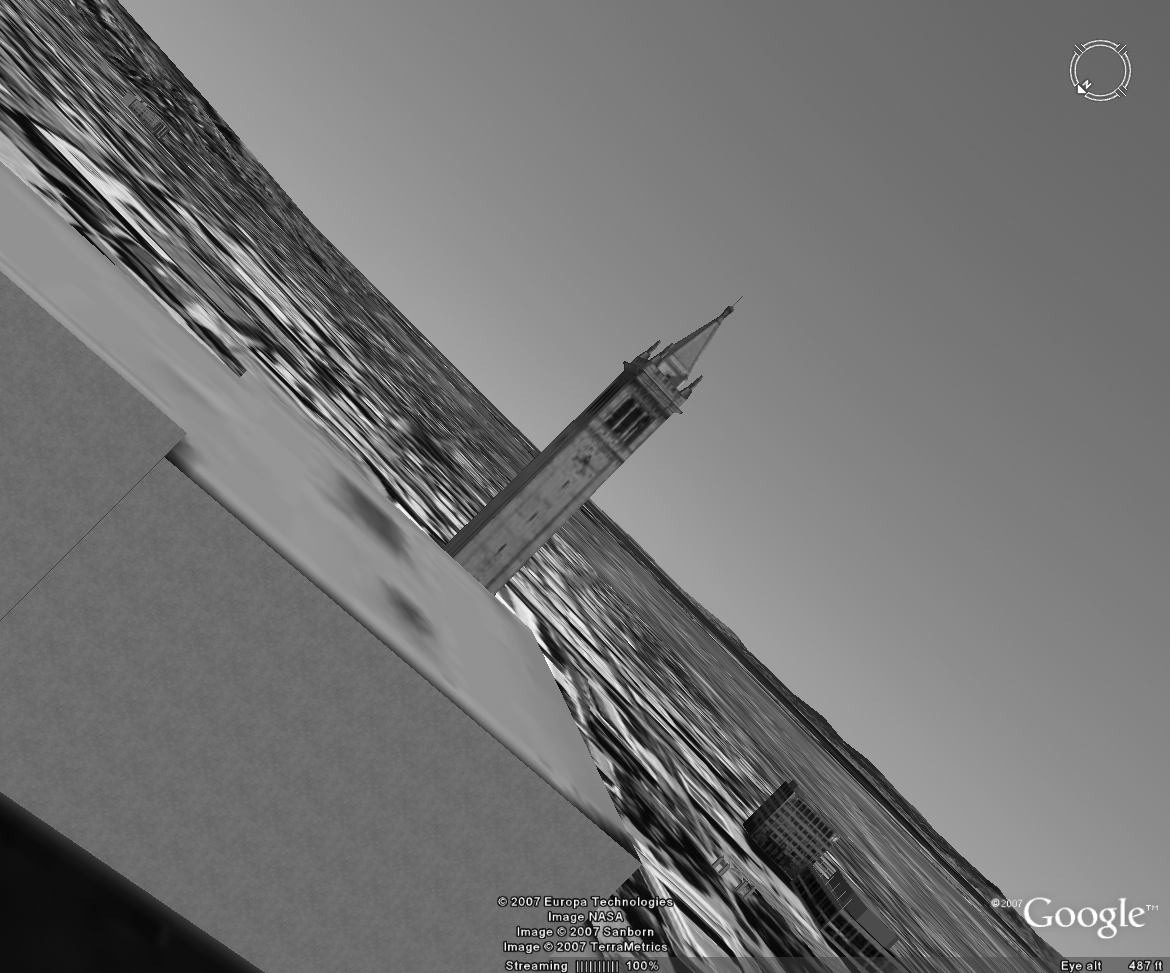
headingis set to 180 degrees, meaning the virtual camera is pointing south. Thus, the Campanile is in view.tiltis set to 90 degrees, meaning it is looking parallel to the ground. (In contrast to the tilt for<LookAt>, which is constrained to a value between 0 and 90 degrees, the tilt for<Camera>can go from 0 to 180 degrees.) It can even be negative, which results in an upside-down view. This difference in the range fortiltallows a<Camera>element to be aimed at the sky, whereas a<LookAt>element could at most be aimed at the horizon but not above it.rollis set to 0 degrees, which is the default value. You can look at the third placemark defined here:http://examples.mashupguide.net/ch13/berkeley.campanile.evans.kmlin which roll is 45 degrees to get a sense of the effect that roll has on a view (refer to Figure 13-6 to see the third placemark).
Figure 13.6. View of the Campanile in Google Earth defined by the <Camera> element with a 45-degree roll
The final KML file uses a folder to group the three <Placemark>
elements, and it associates a <LookAt> element for the folder to
give the folder a view.
Programming Google Earth via COM and AppleScript
In addition to controlling Google Earth through the user interface or through feeding it KML, you can also program Google Earth. In Windows, you can do so through the COM interface and on Mac OS X via AppleScript.[217]
COM Interface
You can find documentation of the COM interface to Google Earth here:
http://earth.google.com/comapi/index.html
The following is a small sample Python snippet (running on Windows with the Win32
extension) to load the previous KML example, highlight each of the placemarks, and
render their respective views in turn. Note that the code uses the
OpenKmlFile method to read a local file so that it can then get
features using the GetFeatureByHref method.
# demonstrate the Google Earth COM interface
#
import win32com.client
ge =  win32com.client.Dispatch("GoogleEarth.ApplicationGE")

fn = r'D:/Document/PersonalInfoRemixBook/examples/ch13/berkeley.campanile.evans.kml'
ge.OpenKmlFile(fn,True)

features = ['Campanile', 'Evans', 'Evans_Roll']

for feature in features:s
    p = ge.GetFeatureByHref(fn + "#" + feature)
    p.Highlight()
    ge.SetFeatureView(p,0.1)
    raw_input('hit to continue')
The following is a Python code example to demonstrate the use of
SetCameraParams to set the current view of Google Earth. Notice how
the parameters correspond to those of the <LookAt> element. At
some point, perhaps, the Google Earth COM interface will support the parameters
corresponding to the <Camera> element in KML.
# demonstrate the Google Earth COM interface
#
import win32com.client
ge =  win32com.client.Dispatch("GoogleEarth.ApplicationGE")

# send to UC Berkeley Campanile
lat = 37.8721
long = -122.257704

#altitude in meters
altitude = 0

# http://earth.google.com/comapi/earth_8idl.html#5513db866b1fce4e039f09957f57f8b7
# AltitudeModeGE { RelativeToGroundAltitudeGE = 1, AbsoluteAltitudeGE = 2 }
altitudeMode = 1

#range in meters; tilt in degrees, heading in degres
range = 200
tilt = 45
heading = 0 # aka azimuth

#set how fast to send Google Earth to the view
speed = 0.1

ge.SetCameraParams(lat,long,altitude,altitudeMode,range,tilt,heading,speed)
AppleScript Interface to Google Earth
In Mac OS X, you would use AppleScript to control Google Earth or something like
appscript, an Apple event bridge that allows you to write Python
scripts in place of AppleScript:
http://appscript.sourceforge.net/
Here’s a little code segment in AppleScript to get you started—it will send you to the Empire State Building:
tell application "Google Earth"
  activate
  set viewInfo to (GetViewInfo)
  set dest to {latitude:57.68, longitude:-95.4, distance:1.0E+5,
tilt:90.0, azimuth:180}
  SetViewInfo dest speed 0.1
end tell
This moves the view to 57.68 N and 95.4 degrees W.
Using appscript, the following Python script also steers Google Earth
in Mac OS X:
#!/Library/Frameworks/Python.framework/Versions/Current/bin/pythonw
from appscript import *
ge = app("Google Earth")
#h = ge.GetViewInfo()
h = {k.latitude: 36.510468818615237, k.distance: 5815328.0829986408,
k.azimuth:
10.049582258046936, k.longitude: -78.864908202209094, k.tilt:
3.0293063358608456e-14}
ge.SetViewInfo(h,speed=0.5)
[214] http://www.technologyreview.com/read_article.aspx?ch=specialsections&sc=personal&id=17537 makes the argument that Google Earth will be exactly that dominant platform.
[215] To start with, you should know the default locations of your stored
KML files: C:\Documents and Settings\[USERNAME]\Application
Data\Google\GoogleEarth\myplaces.kml (Win32) and
~/Library/Google Earth/myplaces.kml (OS X).
